In this post I describe step by step how to install a GNUstep development environment on FreeBSD 10.1. I used VirtualBox 4.3.26 in 64bit Mode for this so that you can run GNUstep alongside your favorite desktop. First I show the installation of FreeBSD inside VirtualBox over network including Guest Additions from a FreeBSD port. Then I continue with installing the FreeBSD's ports of GNUstep in the System domain and after that installing GNUstep from SVN trunk into the Local domain.
Setting up the VirtualBox VM
I am using VirtualBox 4.3.26 which is at the moment the latest version of VirtualBox. But this is not critical, a bit older versions of VirtualBox will do it too.
 |
| FreeBSD is supported by VirtualBox right away |
 |
| I am giving it quite a bit more RAM than the recommended 128MB |
Now create a dynamically allocated disk image
After creating the VM click on "Settings" since there are a few things to change before starting with the actual installation.
 |
| Also, I make the virtual hard disk big enough that I don't need to resize it later |
After creating the VM click on "Settings" since there are a few things to change before starting with the actual installation.
 |
| I always use the bridged network adapter so I can easily SSH from other machines into the VM |
 |
| Don't be so parsimonious with your VRAM, give it the full 128MB |
 |
| Some more cores also won't do bad if you're having to share enough of them |
Installing FreeBSD 10.1 over network
At first you need to download a bootable ISO image of FreeBSD. I've chosen a network based install since it downloads only what you need. Download for instance ftp://ftp.freebsd.org/pub/FreeBSD/releases/amd64/amd64/ISO-IMAGES/10.1/FreeBSD-10.1-RELEASE-amd64-bootonly.iso
 |
| Select the downloaded image at boot time |
 |
| FreeBSD booting (nothing to do here) |
 |
| Select Install |
 |
| Choose a keymap here. I went with the default keymap. |
 |
| Choose the hostname, I've chosen "freebsd10" |
Now I selected to install everything, you might choose differently, but be sure to select "System source code" since you need it later to install the VirtualBox guest additions.
 |
| Don't forget to select "System source code" |
Setting up the network connection for a network based install
Now the installation process of FreeBSD will guide you through the network setup. I had nothing to change here.
 |
| If your screen looks now something like this, e.g. you have got an IP address, everything is fine. |
 |
| Now select the mirror to install from. |
Partitioning the disk
Here I went with the default options. You can of course partition the disk differently, if you know what you're doing.
The installation itself
Now the installation process starts …
 |
| Do not select the ntpd demon since the VirtualBox guest additions will conflict with this. |
Adding users to the system
I added the following users to the system:
user: root
pass: freebsd
user: gnustep
pass: gnustep
 |
| For now I use sh as the shell until bash is installed |
Finishing the Installation
 |
| reboot |
 |
| First login after the installation |
Installing FreeBSD ports
For installing the required ports at first update the ports tree.
As user root do a:
# portsnap fetch extract update
Then install the portmaster port which will make installing subsequent ports easier:
# cd /usr/ports/ports-mgmt/portmaster && make install clean |
| enable bash and zsh completion in the options |
To update outdated ports later do a
# portsnap fetch update
to update the ports tree and
# pkg version -l "<"
or
# portmaster -L
to check for outdated ports,
followed by a
# portmaster -a
or
# portmaster -af
(if some port fails) on a regular basis.
Install bash
as root do:
# portmaster shells/bash
I've chosen the default options for bash and all its dependencies
Change the default shell for user gnustep:
as user gnustep do:
# chsh -s /usr/local/bin/bashinstall x11/xorg
as root:
# portmaster x11/xorg
Choose the default options except for:
llvm35-3.5.2
[x] CMAKE
xorg-server-1.14.7_4,1
(*) HAL
cairo-1.12.18_1,2
[x] OPENGL
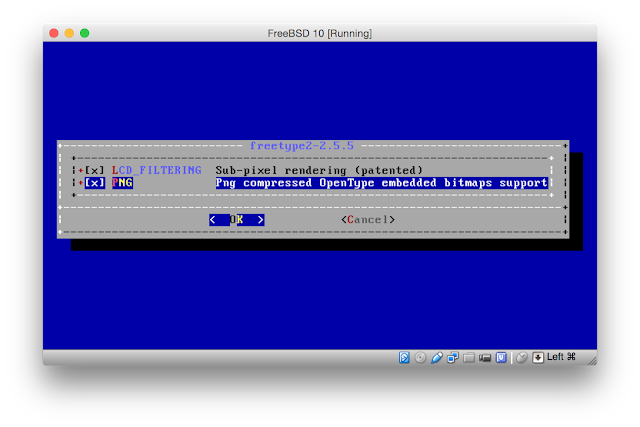
freetype2-2.5.5
[x] PNG
Installing the VirtualBox Guest Additions port
as root:
# portmaster emulators/virtualbox-ose-additions
Choose the default options except for:
virtualbox-ose-additions-4.3.26
[x] OPENGL
Configuring the Guest Additions
add user gnustep to group wheel to enable sudo later
# pw groupmod wheel -m gnustep
enabling Guest Additions:
Add this to /etc/rc.conf in the FreeBSD guest:
 vboxguest_enable="YES"
 vboxservice_enable="YES"
Xorg uses HAL to autodetect keyboards and mice. The sysutils/hal and devel/dbus ports are installed as dependencies of x11/xorg, but must be enabled by the following entries in the /etc/rc.conf file:
 hald_enable="YES"
 dbus_enable="YES"
Reboot or start both services by hand:
 /usr/local/etc/rc.d/dbus start
 /usr/local/etc/rc.d/hald start
see:
Installing the Window Maker port
as root:
# portmaster x11-wm/windowmaker
Choose the default options except for:
jasper-1.900.1_14
[x] OPENGL
webp-0.4.3
[x] X11
enabling Window Maker
In order to run wmaker, a user needs to have an ~/.xinitrc file consisting of something similar to
 #!/bin/sh
 exec wmaker
add this for both user root and gnustep
see:
Launching Window Maker
launch Window Maker to check if everything works so far
 |
| Success! |
 |
| A right click onto the background brings up Window Makers menu |
Installing GNUstep from FreeBSD ports into the System Domain
Installing the necessary tools
Installing the Subversion port
Subversion is needed to check out the sources from GNUstep SVN.
as root:
# portmaster devel/subversion
Choose the default options
Installing the Sudo port
sudo is needed during the GNUstep installation process.
as root:
# portmaster security/sudo
Choose the default options
now logout/login
as root:
# visudo
uncomment the line:
# %wheel ALL=(ALL) ALL
to enable sudo for the group "wheel" and so for the user gnustep (which is part of the wheel group)
Installing the GNUstep libraries and framewoks
I've chosen the way of installing the GNUstep ports into the System domain so I don't need to look after the right dependencies for myself but let the FreeBSD's port system handle this.
Installing the Objective-C 2 runtime
as root:
# portmaster lang/libobjc2
use the default options
Install GNUstep make
# portmaster devel/gnustep-make
use the default options
install GNUstep base (Foundation)
# portmaster lang/gnustep-base
Choose the default options except for
gnustep-base-1.24.6_6
(*) MDNS
Install GNUstep gui (AppKit)
# portmaster x11-toolkits/gnustep-gui
Choose the default options except for
gnustep-gui-0.24.0_5
[x] ASPELL
Install GNUstep back
# portmaster x11-toolkits/gnustep-back
use the default options
Optional: Trying to install the GNUstep examples port (currently broken)
GNUstep examples are a collection of simple GNUstep apps to guide you into developing for GNUstep.
# portmaster misc/gnustep-examples
this port is currently broken
Installing the System Preferences port
System Preferences' purpose is to control certain settings of your GNUstep environment.
# portmaster deskutils/systempreferences
use the default options
Installing the GWorkspace port
GWorkspace is GNUsteps Workspace manager.
# portmaster deskutils/gworkspace
use the default options
Installing the Terminal.app port
Terminal.app is GNUstep's terminal emulator.
# portmaster x11/terminal.app
use the default options
Installing the ProjectCenter port
ProjectCenter is GNUstep's integrated development environment (IDE).
# portmaster devel/projectcenter
use the default options
Installing the GORM port (Graphical Object Relationship Modeller)
GORM is GNUsteps Interface Builder clone.
# portmaster devel/gormSetting up the GNUstep environment
as root and as gnustep:
 $ echo . /usr/local/GNUstep/System/Library/Makefiles/GNUstep.sh >> ~/.profile
 $ echo gdnc >> ~/.profile
or, when using csh (root uses this maybe):
 # echo source /usr/local/GNUstep/System/Library/Makefiles/GNUstep.csh >> ~/.cshrc
 # echo gdnc >> ~/.cshrc
as root and as gnustep, edit the .xinitrc file:
$ vi ~/.xinitrc
that it looks like this:
 #!/bin/sh
 exec wmaker &
 gpbs
 GWorkspace
Launching GWorkspace inside Window Maker
$ startx |
| the tools and services from the System domain are in use |
Installing GNUstep SVN trunk source into the Local Domain
Now continue to install the latest GNUstep from SVN trunk into the Local domain which supersedes the stuff in the System domain.
Checking out the sources from SVN trunk
as gnustep:
 $ mkdir GNUstep-sources
 $ cd GNUstep-sources/
check out all sources from GNUstep SVN:
$ svn co svn://svn.gna.org/svn/gnustep/trunk .Building libobjc2 (GNUstep Objective-C 2.0 runtime) from source
$ cd ~/GNUstep-sources/modules/dev-libs/libobjc2/
for now use:
 $ CC=clang CXX=clang++ make
 $ sudo -E make install
enter gnustep user's password
in the future this will be the way to go:
 $ mkdir Build
 $ cd Build/
 $ cmake .. -DCMAKE_C_COMPILER=clang -DCMKAE_CXX_COMPILER=clang++
 $ make && sudo -E make install
enter gnustep user's password
Building GNUstep make from source
 $ cd ~/GNUstep-sources/modules/core/make/
 $ ./configure --prefix=/usr/local/GNUstep --with-config-file=/usr/local/GNUstep/GNUstep-trunk.conf --enable-objc-nonfragile-abi --enable-native-objc-exceptions --with-layout=gnustep --enable-debug-by-default CC=clang CXX=clang++
 $ sudo -E gmake GNUSTEP_INSTALLATION_DOMAIN=LOCAL install
Don't forget to source GNUstep.sh and make sure this is done on every login:
 $ . /System/Library/Makefiles/GNUstep.sh
 $ echo . /System/Library/Makefiles/GNUstep.sh >> ~/.profile
Building GNUstep base from source
 $ cd ~/GNUstep-sources/modules/core/base/
 $ ./configure --disable-mixedabi CC=clang CXX=clang++
 $ gmake && sudo -E gmake GNUSTEP_INSTALLATION_DOMAIN=LOCAL install
Building GNUstep gui from source
 $ cd ~/GNUstep-sources/modules/core/gui/
 $ gmake && sudo -E gmake GNUSTEP_INSTALLATION_DOMAIN=LOCAL install
Building GNUstep back from source
 $ cd ~/GNUstep-sources/modules/core/back/
 $ gmake -j 8 && sudo -E gmake GNUSTEP_INSTALLATION_DOMAIN=LOCAL install
Building GNUstep examples
 $ cd ~/GNUstep-sources/modules/usr-apps/examples/
$ gmake -j 8 && sudo -E gmake GNUSTEP_INSTALLATION_DOMAIN=LOCAL install |
| Trying Calculator.app from the Examples |
Building Developer Tools and GDL2 (Enterprise Objects Framework (EOF) clone)
Building GDL2 dependencies
as root: install PostgreSQL (needed for GDL2):
 $ su -
 # portmaster databases/postgresql94-server
use the default options
as root: install PostgreSQL ODBC support:
# portmaster databases/postgresql-odbc
use the default options
as root: configure PostgreSQL:
 # echo postgresql_enable=\"YES\" >> /etc/rc.conf
 # /usr/local/etc/rc.d/postgresql initdb
 # /usr/local/etc/rc.d/postgresql start
as gnustep: install renaissance (needed for GDL2):
 $ cd ~/GNUstep-sources/modules/dev-libs/renaissance/
 $ gmake -j 8 && sudo -E gmake GNUSTEP_INSTALLATION_DOMAIN=LOCAL install
Building GDL2 from source
 $ cd ~/GNUstep-sources/modules/dev-libs/gdl2/
 $ ./configure CC=clang CXX=clang++
 $ gmake -j 8 && sudo -E gmake GNUSTEP_INSTALLATION_DOMAIN=LOCAL install
Building ProjectCenter from source
 $ cd ~/GNUstep-sources/modules/dev-apps/projectcenter/
 $ gmake -j 8 && sudo -E gmake GNUSTEP_INSTALLATION_DOMAIN=LOCAL install
Building GORM from source
 $ cd ~/GNUstep-sources/modules/dev-apps/gorm/
$ gmake -j 8 && sudo -E gmake GNUSTEP_INSTALLATION_DOMAIN=LOCAL install |
| Now the tools and services in the Local domain take precedence |
That's it for now.
Have fun developing with and for GNUstep!


No comments:
Post a Comment